These instructions assume Microsoft Outlook 2013 is used on a Windows operating system. These are specifically how I add profiles for other Office365 hosted mailboxes without an issue, but these instructions will get you most of the way through adding profiles for on premise or other similar setup you may have.

Another important point to note is that the mailbox you are trying to add must not be hidden from any address list view, you need to be able to see this mailbox in an address book view. If it is hidden, unhide the mailbox, add the profile, then you can hide the profile again afterwards. The user credentials you are specify for mailbox access must also have Full Access permissions to the mailbox you are trying to add.

Browse to Control Panel and click Mail, assuming you already have a profile configured (your own personal email account) it will likely return the Mail Setup screen for the profile you already have configured. Click the Show Profiles… button to return the current list of profiles, ensure that the Prompt for a profile to be used option is selected, click Add…

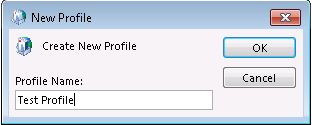
Enter a Profile Name of your choice and click OK >

AddanOutlookProfile1

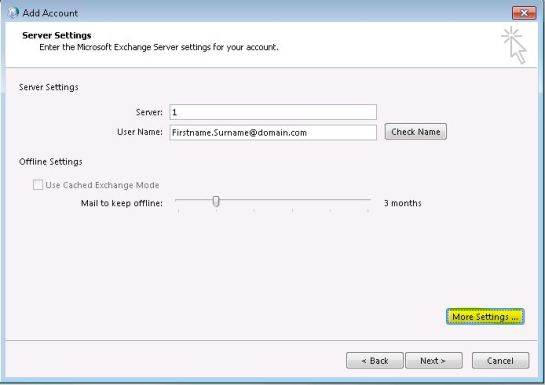
This will launch the Auto Account Setup, I always choose the Manual setup or additional server types option and click Next > Select Microsoft Exchange Server or compatible service and click Next > On the Server Settings screen I always add a dummy entry in the Server section as this isn’t actually used because Outlook Anywhere settings are specified shortly and they use the Autodiscover service to map up correctly. Add the entry of 1 and tab into the User Name section. In here I usually add the primary SMTP address of the mailbox you are wanting to setup in this profile, so for example I would add Firstname.Surname@domain.com but do not click Check Name. I usually disable Offline Settings for secondary profiles particular on shared mailboxes which may be quite large, this is up to you > Now do not click Next, instead click More Settings… >

AddanOutlookProfile2

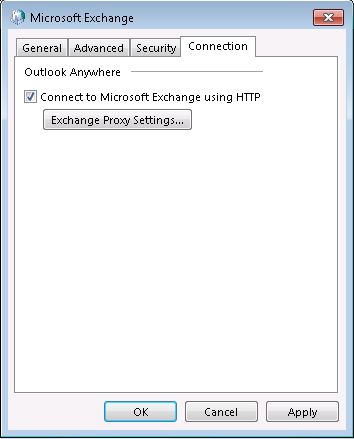
Click into the Connection tab and check the Connect to Microsoft Exchange using HTTP option and click the Exchange Proxy Settings… button >

AddanOutlookProfile3

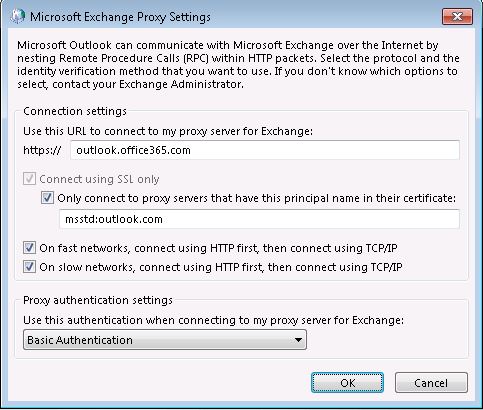
Tick all check boxes and select Basic Authentication in the Proxy authentication settings section. In the top Use this URL to connect to my proxy server for Exchange text box, enter outlook.office365.com and msstd:outlook.com in the Only connect to proxy servers that have this principal name in their certificate text box and click OK >

AddanOutlookProfile4

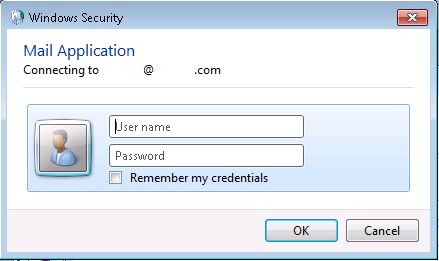
Click OK again on the Microsoft Exchange pop out screen you should have been returned to, this should now return you to the Add Account / Server Settings screen, now click Next > This should now pop up a Windows Security screen prompting for credentials to connect to the mailbox. In here you should provide a fully qualified username e.g. firstname.surname@domain.com and the password for that account, I don’t usually check the Remember my credentials check box but this is up to you, once the credentials are provided once I don’t usually get prompted again for credentials whenever that profile is selected at Outlook startup. Click OK once you have added the credentials >

AddanOutlookProfile5

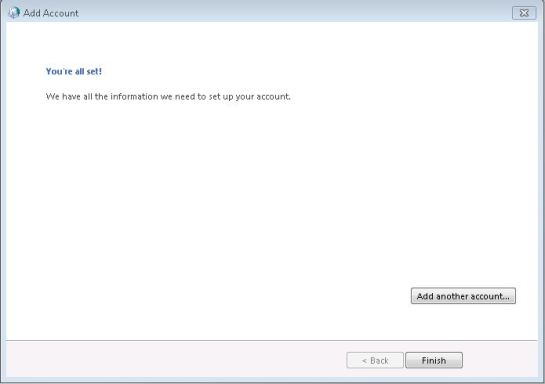
All being well you should receive the You’re all set ! screen where can now click Finish.
AddanOutlookProfile6

I have read quite a few people trying to implement an always reply email rule to a shared mailbox and experiencing some difficulties with this. So here is my working solution which I use to achieve this as the standard Out Of Office (OOF) offering is not suitable.

I have a shared mailbox I use to catch all leaver email addresses in one place, and respond every time to the sender with a template created via Outlook.

Once a leaver departs, I add their primary SMTP email address to the shared mailbox and convert their user mailbox to a shared mailbox for others to view if required, then eventually purge.

You need to have Full Access permission to the shared mailbox (send as is not required for this type of auto response rule), and then have an Outlook profile created so you can access the mailbox via an Outlook. Whilst you set up the Outlook profile, the mailbox needs to be displayed in the address list if not already, it can then be hidden afterwards. Also remember that when prompted for credentials to the shared mailbox, you must use credentials for a user who has Full Access permission, not the disabled Active Directory account credentials.

Once you are up and running with the Outlook profile for the shared mailbox, you can now set up the rule as you would normally.

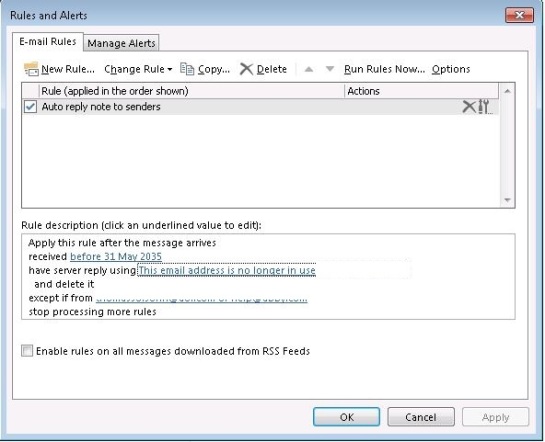
Here is the configuration set up of the Outlook rule I run without issue, note that when viewing the shared mailbox auto reply rule with a template via OWA, it displays that this rule exists but it is greyed out with the message stating that it must be viewed via Outlook:

OutlookRuleForAutoReplyFromSharedMailbox_OWA

This rule is a server side rule and doesn’t rely on Outlook or OWA running all of the time, but OWA cannot display it I think because of the email template being created via Outlook.

OutlookRuleForAutoReplyFromSharedMailbox

Select condition(s) of the Outlook Rule:

  • received in a specific date span” parameter, “After” should be unchecked, then check “Before” with a date far into the future – my example is set to 31 May 2035.

I use the date span parameter as this allows the rule to catch all emails rather than checking for the recipient address in the To and / or CC fields. Of course you could set up individual rules for individual email addresses on that shared mailbox if you wish.

Select action(s) of the Outlook Rule:

  • stop processing more rules

Up to you on that one, you may have other rules which you wish to process on that mailbox or as well as this rule, I haven’t so I’ve added that to my rule.

  • have server reply using a specific message

If you click the using a specific message hyperlink it will open up a standard Outlook email window where you can create an email with various hyperlinks / colour etc. in the usual HTML format. The server will then send it as HTML if you are supporting that, otherwise it will fall back to standard text format depending on the recipients and / or your server policy. Basically it behaves just like a normal email send from an interactive user in Outlook.

  • delete it

We have this set so it receives the emails but puts them in the Deleted Items folder. As stated before, this is a temporary pick up area for our leavers emails in case they still have personal accounts attached to their corporate email account, we can still see the contents to forward them on or if a real customer or contact is still trying to get in touch. If this wasn’t set then the emails simply arrive into the Inbox of the shared mailbox, if we were using a transport rule at the server side then we wouldn’t see the email bound for the specified address.

Select exception(s) (if necessary) of the Outlook Rule:

  • except if from people or public group

This is an important section to include once you have identified any potential mail loops that may occur. Out Of Office (OOF) sends a single email to the recipient after it was first enabled, so you very rarely get into a mail loop of your Out Of Office (OOF) responding to another always responding mailbox externally like a donotreply email address which in turn keeps emailing back saying “thanks for your email” etc.

You need to keep an eye on the mailbox when this rule is enabled, you will need to see if any such mail loops start occurring and in turn add those email addresses to this exception list. If the shared mailbox is used to receive support requests for example where real people will be emailing in, I doubt you will get this issue. But, if external senders start using a ticket system which generates emails that are sent to the shared mailbox (I have experienced this!), you will need to exclude those email addresses to prevent a mail loop of send and receive emails occurring.

Hope this helps!

Initially we had an on premise Exchange 2010 server running many user mailboxes as well as shared mailboxes. These shared mailboxes were used for things like inbound support requests and they had a list of various individuals who have Full Access permissions and / or Send As permissions.

When on premise they existed as user mailboxes, when migrated to Office365 that would require a license per mailbox, or convert it to a shared mailbox to free up that license. Straight after migration they become user mailboxes which requires an Exchange Online license assignment within the 30 day grace period.

The first thing I did was change the mailbox to a shared mailbox via a remote PowerShell script to Exchange Online, remember the maximum shared mailbox size has now been revised and is now up to 10GB but you can of course set them smaller depending on what is going to end up in there. My example was set with a 5GB limit:

Get-Mailbox Name | Set-Mailbox –ProhibitSendReceiveQuota 5GB –ProhibitSendQuota 4.75GB –IssueWarningQuota 4.5GB –type shared

The first time I did this I had a couple of the disabled accounts previously associated with the migrated mailboxes automatically switching back to User mailboxes. I am running full single sign-on (SSO) and so I also have Active Directory Sync running. As these mailboxes had been migrated from an on premise Exchange 2010 server with the appropriate service packs and patches applied, a couple of the mailboxes were still suffering from a documented bug (http://support.microsoft.com/kb/2710029) that kept switching them back to user mailboxes.

I was experiencing this issue relating to the msExchRemoteRecipientType value not getting updated following the conversion of the user mailbox to shared.

Once you have switched the mailbox to be of type shared, force an Active Directory Sync to see what the on premise disabled account now has for that value. Double check that the msExchRemoteRecipientType has a value set at 100 on the disabled on premise Active Directory account, if it is incorrect then update it manually on premise via the link above and then force a Directory Sync to ensure that value is now populated in your Windows Azure Active Directory (WAAD) Tennant.

msExchRemoteRecipientType

Once you know you have got all of the above completed and you are fully in sync, I usually give it 24 hours so I can be sure the mailbox is still accessible / mail is flowing in and out etc. then you can remove the Exchange Online license if you previously had it allocated. I never needed to complete this step for the migrated shared mailboxes because I completed the migration and then the switch from user to shared mailbox within the 30 day grace period, but I have completed this for leaver mailboxes so I can keep them for reference until purging.

If it is a migrated mailbox or a mailbox that previously existed with other permissions granted for Full Access and / or Send As, all of these permissions along with custom parameters and any mailbox rules are preserved.

The one downside we have discovered with this since the migration from on premise is that you cannot access these shared mailboxes via Active Sync e.g. as a separate Exchange account on a mobile device. This was useful when wanting to check a support mailbox for example during the various holiday periods throughout the year. But to get around this, you can either play around with some forwarding rules / alerts, or just browse it via OWA.

Like many other people I have been getting involved with Amazon Web Services EC2, but more recently with Windows Azure since their recent release which includes the new Virtual Machines and Virtual Network functionality in response to the requests from many for the IaaS like features AWS and Rackspace offer to name a couple.

I am mainly a WatchGuard appliance person, although we all know that once you’ve mastered an enterprise firewall, you can usually turn your hand easily to other devices such as Cisco / Juniper etc. It was over a year ago when I was getting our Virtual Private Cloud (VPC) provisioned on Amazon Web Services mainly for test and development purposes. I got that successfully connected and it still run today, although not directly connected to a WatchGuard appliance. After a lot of trial and error it was confirmed by WatchGuard forums and WatchGuard support themselves that due to AWS requiring the use of BGP over an IPSec tunnel it couldn’t be achieved with a WatchGuard appliance. That is still a known issue with WatchGuard, at the time of writing this the latest 11.6 release notes detail this limitation. To get around that I went out and bought a supported AWS VPN appliance, that was a Cisco 881 Integrated Services Router which I added to an interface of my WatchGuard appliance. The Cisco router has the VPN connection into AWS, there are then some routes and NAT rules set up to allow the traffic to flow across the main WatchGuard appliance seamlessly. Details on that setup are available if anybody is interested.

So back to Windows Azure, WatchGuard is again not on the supported appliance list and I think it is because it has similar issues although it can work and remain stable (to an extent) as I have finally proved. These settings should get you working, although I would say that you can’t rely on this for consistent uptime between your local LAN and the Azure Virtual Network so I would strongly advise against it for use with any production systems. Simply because it can remain stable for many minutes (sometimes hours) but then it can continuously drop and reconnect within minutes. It’s a proof of concept at the moment and it could mean that with the right feedback supplied to WatchGuard Support, it might be that WatchGuard appliances start getting added to the these big IaaS providers compatibility lists in the future.

At the Windows Azure side I have followed the Microsoft documentation using their lab subnets they detail, so my screenshots of my WatchGuard configuration correlate to those. There is a slight difference with the YourCorpHQ subnet which in my case is 192.168.1.0/24.

At present I am using a WatchGuard XTM 510 running version 11.4.2.B322805. Some of the reliability issues may improve with the latest 11.6 version, although I have been reluctant to upgrade to the latest WatchGuard version of software due to the 11.5 issue back in November 2011 which caused me a lot of pain where a configuration change wouldn’t take effect unless the device was rebooted. Whilst I know that has now been corrected, I have learnt that I need to reserve more time out of hours to fully test the latest WatchGuard software versions before going live with them.

Here are my settings which are proving reasonably stable, although it changes without notice and you can get the VPN tunnel consistently dropping and recreating.

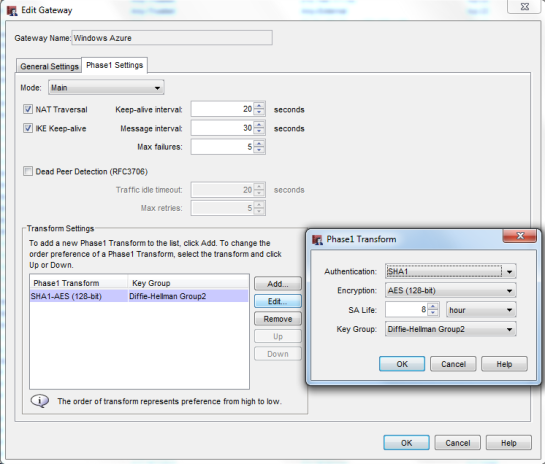
Gateway Configuration

A note on the Remote Gateway ID value – I had read that the .5 IP address was traditionally the IP used in the handshake process although this wasn’t set in stone and part of the reason why the WatchGuard appliances are not supported, Cisco and Juniper take care of this automatically. For a time I had a connection (without any routing working) with the .5 IP address, but recently the .4 IP address (found in the IKE debug logs) has proved much more reliable. I am still on the hunt for the exact detail behind this ID and IP address relationship and why those addresses are used often, if anybody get enlighten me then please me know. It is likely it will change again and so my connection will drop and I will need to manually change it to whatever Windows Azure is asking for.

Any other encryption settings in Phase 1 have failed for me, so it has always had to be SHA1-AES (128-bit).

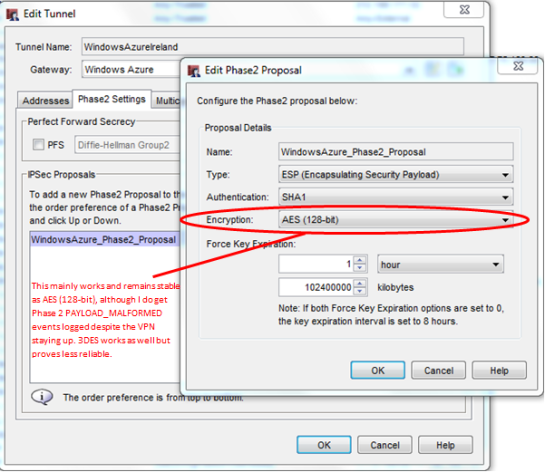
Tunnel Configuration

Phase 2 is where I have seen my issues occurring, even when the VPN remains stable (with the odd 1 or 2 ping timeouts whilst the tunnel rebuilds), I get the PAYLOAD_MALFORMED message which causes the tunnel to rebuild itself. Prior to that as an example I have had a stable connection for over 2.5 hours with 2 rekeys in the process due to the force key expiration of 1 hour.

It’s not a full proof solution but at least proves that it can work to an extent. As I’ve said earlier, I am hoping WatchGuard catch up with these IaaS virtual private networking methods so we can use these devices with what is becoming an everyday resource.

Give me a shout if you want to discuss or trial some different settings. My virtual network is a play area and just a play with the technology, apart from the odd test / development server which may require domain connectivity then I am struggling to find a cast iron use case for having a tethered virtual network to your corporate LAN. I will be experimenting with Active Directory Federation Services (ADFS) up to Windows Azure in the future which would solve the cloud hosted servers being members of the corporate domain. I currently have ADFS running with Office 365 as we currently use Lync with Office365 with our corporate credentials used as the login, there is also a plan to migrate our on premise Exchange 2010 server to Office365 in the future.

So Windows 8 is upon us, and to get myself and my development colleagues introduced to the new operating system, I did the generous thing of building a VHD image in Hyper-V, sysprep’d it, and then gave each of my users a copy.
Here is the documentation I put together for my users with a few edits, obviously I can’t make my own 28GB built VHD image available to the world, but I’ll try and detail what I did so you can follow along.

Basically you need to start off with a Windows Server 2008 R2 Hyper-V setup so you can produce a Hyper-V virtual machine and hard disk. Then you will need the publically available Windows 8 Consumer Preview ISO download which can be found here. You are then setting up a brand new machine from scratch, my recommendation is to create a dynamically expanding virtual hard disk (VHD) of 40GB. It’s often debated about performance etc. of a fixed size disk vs. a dynamically expanding disk, personally I don’t see the dramatic speed differences and for this exercise it won’t matter. This is because the VHD will be mounted as a bootable VHD once it is finished, so when it is in use it expands to the maximum size set anyway. So you do need to be careful about creating a large dynnamically expanding VHD, because it is going to bloat massively and cause all sorts of issues when it is used. You will see later that by setting up your Windows desktop / laptop as a dual boot machine using this method, your local native partition (Windows 7 in my case) is available to browse inside Windows Explorer anyway, so you can get to all your usual files like pictures / videos / music / development areas etc.

Build the machine as a workgroup member and load it up with anything you want in your gold image to distribute, I needed to my gold image up with a load of the latest development tools so my developers could get trawling through Visual Studio 2011 and SQL Server 2012 for example. Otherwise if you just want a standard Windows 8 build, then get it all installed and once you are finished then run the good old WindowsSystem32sysprepsysprep.exe command with the simple ‘Enter System Out-of-Box Experience (OOBE)’ setting and you should be good to distribute.

Important Note: This reiterates what I have waffled on through above, you must have at least 40GB of free disk space on your local laptop disk (if you are sticking with my recommendation), otherwise get ready to catch a blue screen of death! It makes sense because it tries to expand beyond the free disk space you actually have, but when you are initially looking at say a 17GB VHD that you copied down locally, you don’t immediately understand why the blue screen is referring to not enough free disk space.

This is now the lifted documentation so a few steps might be a bit specific to my users, but generally anybody can follow this.

  • Create a folder called HyperV on your local C: drive. You can actually name it whatever you like wherever you like, but this is a basic guide and recommendation.
  • Copy / paste your Win8ConsumerPreview.vhd file (this name is the example I used but this could again be whatever you want) into the folder you created above, so that would be C:HyperV. A basic Windows 8 Consumer Preview build is likely to be around 17 – 18GB, I loaded mine up with a load of developer tools and left the downloaded sources inside the image so mine was around 27GB.Now it gets a bit more intricate and this is where the magic happens.
  • You need to open up Disk Management so you can mount the VHD and get moving. Start > Administrative Tools > Computer Management
  • Browse to Storage and click Disk Management. You should now be able to right click on Disk Management to get a context menu with Attach VHD as an option:

  • After clicking Attach VHD, you will get an Attach Virtual Hard Disk box appearing. Now you need to browse to the folder where Win8ConsumerPreview.vhd file you downloaded above, in this example that would be C:HyperVWin8ConsumerPreview.vhd. Make sure the Read Only check box is unticked. Click OK
  • That will have mounted the VHD file and will now be displaying in the bottom pain of your Disk Management console, it will also have been given a drive letter for the partitions it has found and will probably trigger an AutoRun window, you can ignore this. You are interested in the drive letter it has been given for the main 40GB NTFS partition. This can be any letter so you just need to note down what it dishes out, my example here shows I have been given G: You will also notice that when a VHD is mounted, it shows as a blue disk icon, this is Microsoft’s way of displaying VHD files when they are attached and mounted.

More magic happens here now, this is where you run a single command and it will add that mount point to the Windows Dual Boot Manager to present it the next time you start up your machine.

  • Start a command prompt. Start > All Programs > Accessories > Command Prompt, remember to elevate the command prompt if you have UAC enabled. Using the volume letter you have discovered from step 6 (my example is using G:), type the following command (obviously substituting the drive letter you are targeting to your own) bcdboot G:Windows and press return. A small amount of time will pass, but once complete you should receive a single line output stating that some boot files were added successfully. If you got a successful response, you are sorted.
  • Now if you are ready to get your Windows 8 image prepared for yourself, restart your laptop. You should now be presented with a new Windows 8 style dual boot menu similar to the one below, mine has quite a few more boot images but yours will show 2 (your own local Windows 7 image, then a Windows 8 Consumer Preview option). Choose the Windows 8 option to progress:

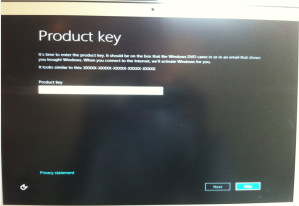
  • The image you are using has been sysprep’d, so it will ask you first of all for a product key, here you will need to type DNJXJ-7XBW8-2378T-X22TX-BKG7J then click Next. This isn’t my product key, this is a publically available product key on the web so I can share this, there are also others kicking around if this doesn’t work for whatever reason, a simple Google search will get you sorted out.

  • Now you should be prompted for a machine name. You can call it what you want, but we need to avoid clashing with current machine names already on the network so I would advise we try and follow some sort of naming convention. Please therefore name your machine starting with W8CP- but then add on something that represents your name in some way. Some people have longer surnames than others, so use initials or a shortened name. So for example, my machine would be named W8CP-PRuler. All of these machines will be standalone workgroup machines, but you can browse to the usual network locations using fully qualified paths and then authenticate with your usual domain credentials.

  • After that there will some usual setup options around firewall, user profile etc. which you are free to choose what you like. It is probably easier just to accept the defaults to begin with which I think says something like Express setup. Then you will be asked if you want to create a local account, there is already a local account called LocalUser created without a password (this is specific to my setup, yours will differ depending on what you did on your gold image). That is a full local administrator, if you want to login as Administrator then the password is xxxx. (Again, specific to my build, you may have left the local Administrator account disabled for example). I would recommend creating your own local account to begin with, then look into hooking it up to your Windows Live ID login so you can experiment with keeping user profile settings amongst other stuff in your SkyDrive which is a big Windows 8 thing they are pushing.

And that should be it, you should be running your own Windows 8 operating system which is loaded up with whatever you chose to include in your gold image.

Don’t worry about the Windows 8 partition (C: as you will see it once you are running it) having only around 11GB of disk space. In the Windows Explorer view you should be able to see your local laptop Windows 7 partition which you can browse freely, therefore if you have any documents or you wanted to copy / paste over projects or solutions files you run daily in Windows 7 over to Windows 8 then you can. Basically get involved, have a play and give me a shout if you get stuck with anything.

The only downside to running this VHD as a bootable partition is that there is no snapshot functionality like with a virtual machine. Therefore you are reliant on system restore points in Windows itself, just the same way as you are with your local Windows 7 operating system. But as it is quick to provision, if you do completely goose the Windows 8 VHD you are booting from, you can just boot back into Windows 7 and start this whole process again with a fresh copy of the original sysprep’d VHD file.

Have fun and by all means give me a shout if you are struggling with anything.